I make sure the Ground Power Unit is plugged in, 'cause our battery will only last a few minutes under a heavy electrical load. I turn on our main battery switch, and fire up the avionics and inverters, which convert DC power to AC power for the instruments that need it. I turn on our standby artificial horizon, and let it spool up. It runs on a completely independent electrical source in case we lose all our AC and DC electrics. I check our fuel levels and use the little conversion card in my wallet to decide how much fuel to get, which is predetermined by the flight planning software we use, Jeppesen FliteMap. I turn on our tablet PC which provides us with satellite weather and radar feeds and Jeppesen approach charts that will overlay our aircraft position on them through a GPS feed. I then get settled in and go through our before-start checklist, testing various aircraft systems like our annunciator panels and our electrical systems and our cockpit voice recorder, our oxygen masks etc.
I then get the ATIS transmission, paying particular attention to the runway in use, and the temperature. It's kind of dumb, Cessna makes us consult 2 different manuals to get information on speeds and thrust that we need on each flight, so combined them - I made up a little book last year which shows our various allowable settings, it looks like this (click on it to make it bigger):
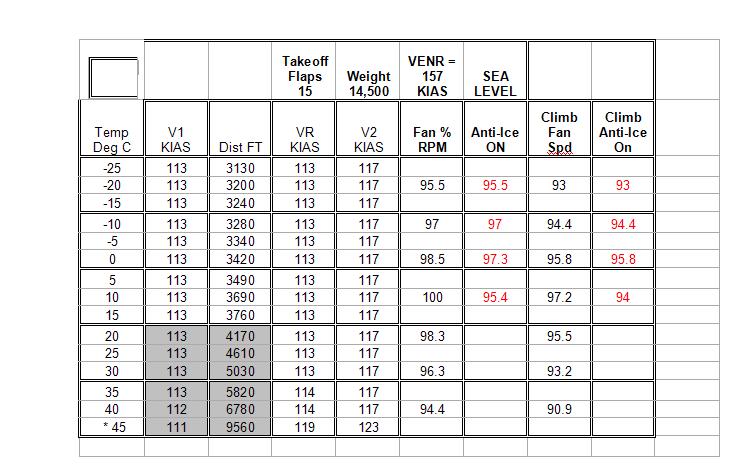
This chart shows us at our maximum takeoff weight of 14,500lbs at sea level. I did up charts from sea level all the way up to 7,000' ASL, and in 500 lb increments from 11,500 lbs to 14,500 lbs, for a total of 56 charts. Yeah, it took a long time to do them all, but it really makes it a lot quicker to get the information I need. The newer series of corporate jets will calculate all this information for you, but not the 550 I fly.
Anyway, for example, suppose it was zero degrees outside when we were going to take off from Boston Logan airport, elevation 6'. I just read across the chart and it tells me my V1 is 113 knots, my Vr is 113, my V2 is 117, my Venr is 157, and I am going to need 3,420 feet of runway in no-wind conditions if I want to meet my accelerate-stop requirements. If the temp is between two different charts, then I either interpolate them or just use the chart that has the more conservative set of numbers and requirements. I also have the original Cessna charts on board the aircraft in case the numbers are really tight (going out of Aspen, Colorado on a hot day for example), but the charts I made work in 99.9% of the situations I have encountered so far. Anyhoo, moving right along...
That chart also tells me that I can use 98.5% N1 rpm for my takeoff thrust setting, reducing it to 95.8% in the climb (we set climb thrust at 1,000' AGL after takeoff). If there was visible moisture in the air and we needed to use our engine anti-ice systems, we could only set 97.3% for takeoff and 95.8% for climb as the anti-ice sucks a little power from our engines and makes them run a little hotter.
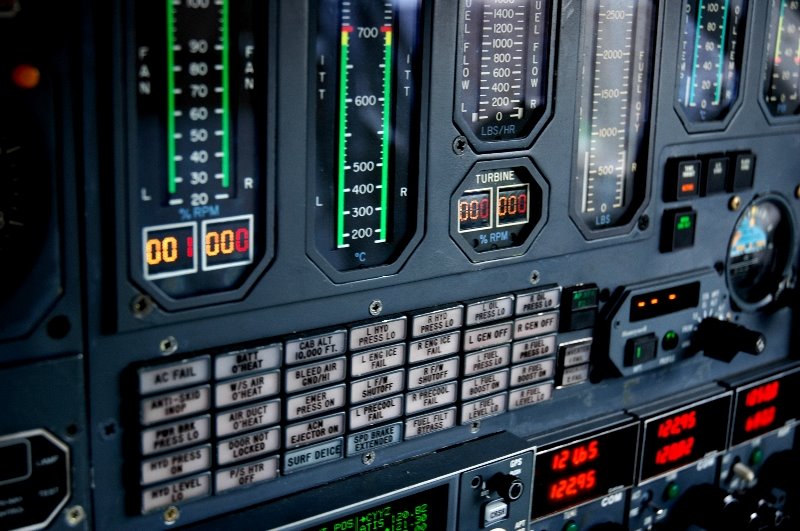
On the left of this photo are the N1 gauges (the ones marked FAN with the digital displays at the bottom), which is our primary indication of engine power. You can see a backup artificial horizon at the far right - this particular airplane has 3 primary artificial horizons and one backup - the boss likes lots of backup systems.
For those of you who don't deal with V speeds, here's the rundown:
V1 is the decision speed we use - if anything major happens before we reach that speed, we can pull the throttles to idle, stomp on the brakes, deploy the speedbrakes, pray, and stop in around 3,420 feet of runway (according to that chart). After that speed, it's safer to continue the takeoff and come back around to land rather than attempt to stop on the runway. It's also the min speed at which we can blow an engine, continue the takeoff and still make the minimum required height above the runway at the end of the runway.
Vr is rotation speed, the speed at which we pull back on the control column and start pulling the nose to 11 degrees nose-up for the takeoff. It's also determined so that we will reach V2 speed by the time the aircraft is 35' above the runway in climbout. Which leads us to...
V2 is the best single-engine angle of climb speed, so if we lose an engine we attempt to maintain V2 which will give us the maximum altitude in the shortest lateral space. Climbing at V2 speed following an engine failure will let us meet our second-segment climb profile of at least 2.4% climb gradient and which is the limiting segment on the 550, but that's too boring for me to go into detail on here. I think of it as our best single-engine climb speed.
Venr is the best enroute single-engine climb speed. After we have climbed high enough that we aren't worried about hitting trees or parked cars off the end of the runway, we accelerate to Venr for the duration of our single-engine climb.
Phew, my brain hurts.
Anyway, I write down the speeds and thrust settings on a little cardboard card, and put the card on the dash of the aircraft. I then set our various airspeed indicator bugs to reflect the proper V-speeds, and then input the allowable engine thrust rpm settings on a little indicator just above the engine rpm gauges.
I then call clearance delivery and ask them for our IFR clearance to wherever we are going. I read it back and then program our GPS with our route, taking care to spell the waypoints correctly lest the plane think we are going from Toronto to Ottawa via some spot in Ecuador. I pull out the airport diagram charts for Toronto and put them in the chart holder in the right seat so my copilot can tell me where the hell we go to get on the proper runway - after a year I'm still not entirely comfortable around Pearson, so I always get the copilot to double-check our position and routing while we are taxiing.
Once the route is entered in on the GPS, we are pretty much good to go. While I have been doing this, the copilot has been setting up the back end of the plane, making sure the magazines and newspapers are on board, and the ice is in the coolers, and the snacks are fresh, etc.
Then we wait for the passengers to show up, load them up and the copilot does a safety briefing while I fire up the engines. The start sequence for the 550 is very simple - press the START button on whatever engine you want (it doesn't matter which one we start first) and wait until around 10% rpm, then move the throttle from the off position to the idle position, then wait until the engine stabilizes at around 49% rpm - It takes maybe 15 seconds from the time we hit the start button to the time the engine is happily idling. We then do the same thing for the other engine. In some turbine aircraft you can easily exceed various temperature and pressure limits while starting the engines, but not this puppy - I have never even come close to a hot start with these engines. If I did, I'd simply pull the throttles back to the "OFF" position and hit another button cleverly marked "Starter disengage". This is a slow, stable airplane and there are few situations where you have to have cat-like reflexes while operating it.
Once we have the engines up and running, we indicate to the ground crew person that we want them to disconnect the ground power unit, and then we put our generators online and the ship starts to run on her own power.
More airplane geekery later, my fingers hurt. Hopefully I can get the plane to take off in less than 10,000 words :)
2 comments:
Can't wait man. keep it coming..
JBAIL..
I love post like this. I love the detail. I can almost close my eyes and picture myself doing the job. Thanks again.
JBAIL
Post a Comment